
Demo Reel

Evan Bianco
Evan Bianco is a 3D animator/artist and creative writer graduating from TCNJ. He interned with a team of artists working with Aquatic Group Graphics on the short film Inseparable. Starting this June, he will be attending the online school Animation Mentor, where he will be studying animation from industry professionals and veterans.
The Origin Story
To begin at the end, my thesis ended up being what is essentially an updated version of my demo reel. It includes some clips that I made over the course of thesis, as well as other clips that I’ve made in the past that I still feel fit within the reel. I’m treating this as I would a reel I’d make to show to a potential employer. For the clips I made during this semester, I tried to focus on things that I hadn’t done previously, such as a run cycle for a dog and a non-cycled animation for a human character. I did want to include more character acting shots, but that ended up being a little too much for me to handle at the moment, and it’s something I know I need to work on in the future.
Speaking of too much for me to handle, I guess I should mention what my original plan was, which was a fully fleshed out short film. I originally wanted to be a fight scene between two characters, but at the beginning of this semester I realized that the choreography alone would have taken me too long, before taking into account all of the modeling, rigging, texturing, and other things that I would have had to do. Ultimately, I want to be an animator, and those are not things you are expected to show in an animation reel, so eventually I decided it was better not to waste my time with those things and try to focus on the animation itself.
The Highlights
I want to take the time to talk about two specific animations that I learned a surprising amount from despite how simple they may seem: the running dog and Zelda swinging a sword.
To begin, I’ll talk about the running dog. Now, I had done the walking dog cycle a decent amount of time before this, so I had a sense of how different things were going to be compared to a bipedal character. Obviously there’s more legs to deal with, but there were more subtle things to consider. How was the movement of the front legs offset from the back legs? Was the hip rotation any stronger than the shoulder rotation? How did the head and neck move at different points in the walk, and how did one influence the other? Those were all questions I asked myself during the walk, and so I had a sense of those answers going into the run, but with the knowledge that nothing would be quite the same. The hip and shoulder movements would be more exaggerated, the timing of the neck and head movements would be quicker, and so on. But I also learned new things about the body mechanics of a dog as well. Mainly, it was the way in which the dog’s movements were oddly similar to a human, at least in concept. When a person runs, they’re essentially making a small jump through the air, with one foot leaving the ground just as the other foot lands. When it comes to the pairs of legs of a dog, that is not the case, as both feet will be on the ground or in the air at roughly the same time. But the timing of the front and back legs relative to each other is basically the same as a human run; one pair takes off as the other lands. In essence, a dog running can be thought of as two people leaping forward at an offset. Perhaps that isn’t exactly the revolutionary discovery to others as it was to me, but I like to see the patterns in things, and being able to see one with a practical application was exciting for me.
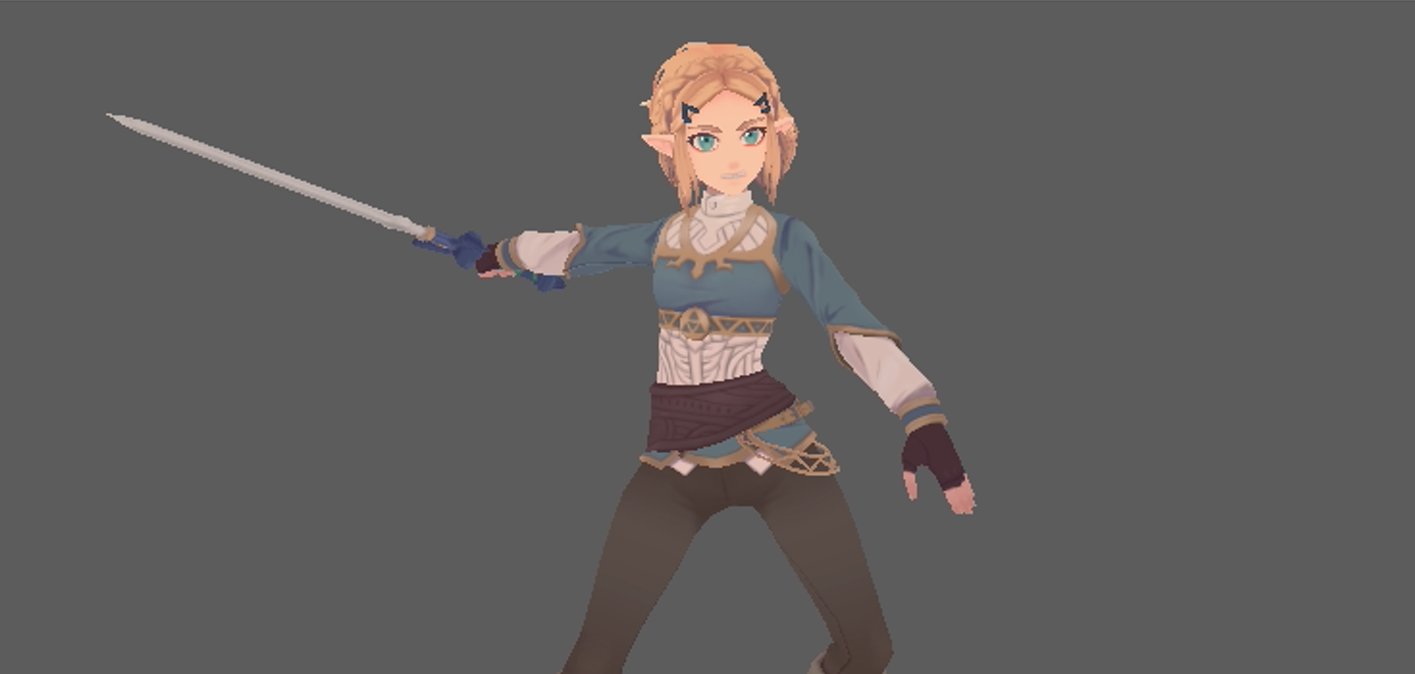
Next is Zelda swinging her sword before striking a pose. Fans of the Zelda series may recognize it as one of Link’s animations from some of the games in the series (at least from Twilight Princess onwards). My idea for the shot was to simply take that flourish and think about how it might be different if it were performed by Zelda. In the end, it mainly came down to the pose at the end. Link is a very stoic and straightforward character, whereas with Zelda (at least this version of Zelda from Breath of the Wild), I imagined her more outwardly confident… and maybe a bit sassy. To show this, I pushed the position of her shoulders and hips, as well as having her face make a more cocky expression at the end. Doing the same action with different characters is honestly one of my favorite things to do, because I think it is a very good way to figure out how to show different personalities and emotions via body movements and other non-verbal cues.
The Method(s) Behind the Madness
Seeing as I am surrounded by a sea of fantastic 2D animation, I would also like to take this opportunity to talk a bit about how 3D animation works and a bit of what I learned about the process this semester.
I’d imagine 2D animation is a bit easier to grasp for most people, as it is essentially a series of drawn pictures which, when recorded and played back, forms a video. 3D animation follows many of the same principles and theories as 2D animation, but the way in which you go about it is different. As my mother put it after I tried describing the process to her, it’s kind of like controlling a puppet. You have a predefined model with tons of controls attached to it that you are then able to move to position a character. When an animator is animating a character, this is generally what it looks like:
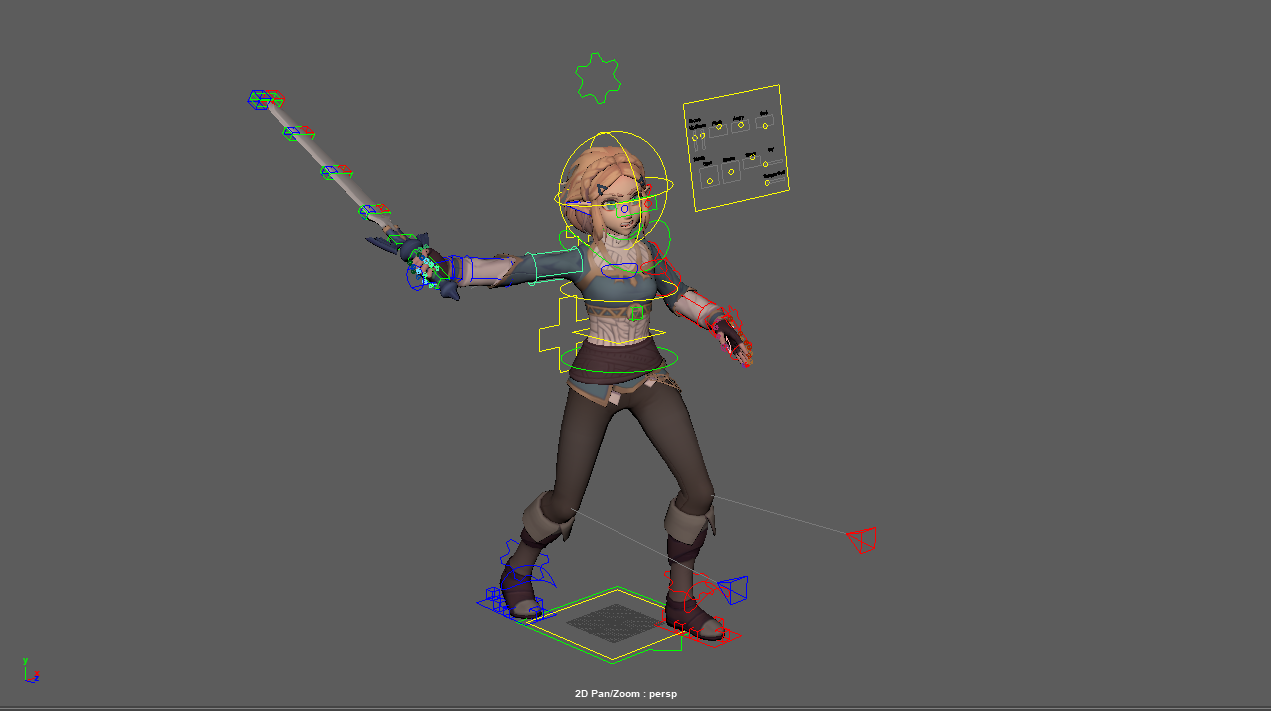
Now, the process of creating a model, texturing it, and rigging it in order to prepare it for animation is a process in and of itself, with different people often handling a specific task. As the animator, I take the model and use it’s controls to move it around either by rotating the selected part or by translating it. After I do that though, I need some way to save the positional changes that I made in order to move on to the next part. This is done using a “keyframe,” which is visualized like this:

This is the timeline of the Zelda animation. Each numbered space represents one frame, and each red line represents a keyframe. In the case of all of my animations in this demo reel (as well as basically all feature film and television animation), there are 24 frames in a single second of video. That might not sound like a lot, but as you can see, on almost every single frame I had to go in and make some sort of change to at least one of the character’s body parts into order to get the movement just right. That takes time, and it only takes more time as the animation gets more complex, so that is often why animated films often have a shorter run time on average than live action productions. Another thing I want to show is something you might not expect an artist to have to spend a great deal of time looking at:
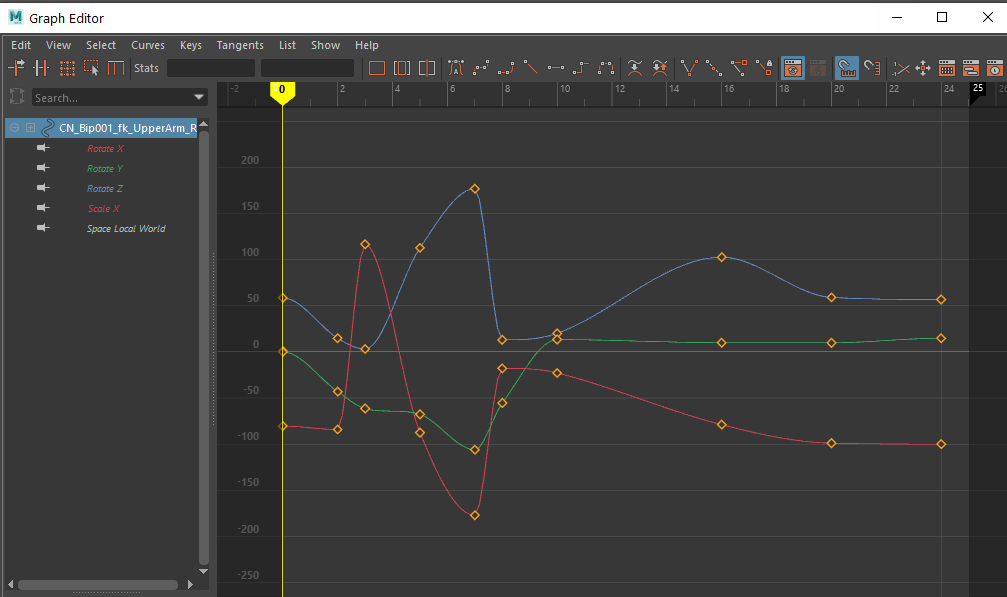
This is a graph which plots the positional data of a control over time. Each colored line represents the different axis the control is moving through (XYZ), and the orange markers are the keyframes. This window, called the “graph editor,” allows for the animator to have more precise control over the position and timing of a control, since you can grab one or more keyframes and move them around however you wish. The downside of this is that, for some people, it’s just not as fun as manipulating the character itself. It may make things feel a bit too technical or mechanical, which can really be said about 3D animation as a whole when compared to 2D, but that’s why I love it! You can still be artistic and expressive with how you pose characters and make them move, but because you’re dealing with a computer, you have numbers and math to work with in order to have has much certainty and precision as you could want.
The last thing I want to talk about is the main thing I learned from this semester, that being the answer to the question “how do you go about doing this?” To be more specific, how do you go from having a completely neutral character to a finished animation? The real answer is that there’s a million different ways and it depends on the variety of factors, mainly personal preference, and what the shot calls for. The latter is what I gained more insight on due to how I animated the run cycle as opposed to the Zelda clip.
For the dog, I started off by positioning the dog’s legs at the three different points: the beginning, the middle, and the end. Now, because this is a cycle, the beginning and the end are the exact same pose, which in this case is the position of the dog’s legs when its front paw first hits the ground. The middle pose is what the legs look like when its hind paw first hits the ground. Now, if you want to know what it looks like when you hit play on the animation with only those poses, imagine a dog hovering and paddling through the air with no other body movement whatsoever. While the computer will move the controls from one point to another on its own, it’s going to take the shortest possible route with the information it has been given. There is no “walking dog” button, meaning I’ve got to give it more information. In this case, I started by going to the point in the middle of the first two poses, and positioned the legs so that they landed or left the ground at the proper time, and did the same thing between the middle and last pose. I then went and added the movements for the other body parts like the hips or the head, starting with the main poses and then filling in the information in between. This is called “key pose” animation, because it starts off with the main, or key, poses, and then adding more poses referred to as “in-betweens” to get the proper timing and motion.
The Zelda animation started off more or less the same, meaning I made the beginning, middle, and end poses first. “Middle” in this case refers to a few poses, those being where the two sword swings ended and when she holds the sword to her back before striking the final pose. As for the next steps, I ended up trying something fairly new to me, and not necessarily on purpose. While my first instinct was to keep making more in-between poses to develop the motion, I started to just focus on Zelda’s sword arm first. I realized that it was the most important part of the animation; it’s where all the action is and it will most likely be what the viewer focuses on. So what I ended up doing was animating the arm movement completely before doing anything else. The rest of the body’s movement made no sense yet since those parts were just working off the key poses, but the arm movement was fleshed out and could inform what I did with the rest of the character. I then went back to the beginning and focused on the character’s shoulders and hips, then her other arm, and so on. This style was a sort of “straight ahead” style of animation where I focused less on individual poses and more on the movement itself. Not only that, I took a more layered approach, meaning I would focus on a specific part of the character rather than trying to animate it all at once, and more so than I did with the dog.
In summary, I feel I learned a lot from just these two short pieces of animation. From aspects of body mechanics to overall animation principals, I gained a good amount of information that I can apply to future works. The animations themselves may not be particularly complex or flashy, but at the end of the day, I’d say I’m a better animator than I was before I made them. That, along with the prospect of continuing to learn and grow as an animator, makes me hopeful and excited for the future.